If you’ve ever wondered how to roll a joint like a pro, you’re not alone. Many beginners struggle with getting that perfect roll, but what if I told you there are expert tips you NEED to know that can turn your rolling skills from amateur to master in no time? Whether you’re a cannabis connoisseur or just starting out, learning the best way to roll a joint can seriously elevate your smoking experience. In this guide, we’ll uncover the secrets behind a flawless roll, from choosing the right materials to the step-by-step techniques that professionals swear by. Curious about how to impress your friends or simply enjoy a smoother smoke? Keep reading to discover the ultimate joint rolling tips and tricks that every cannabis enthusiast should know.
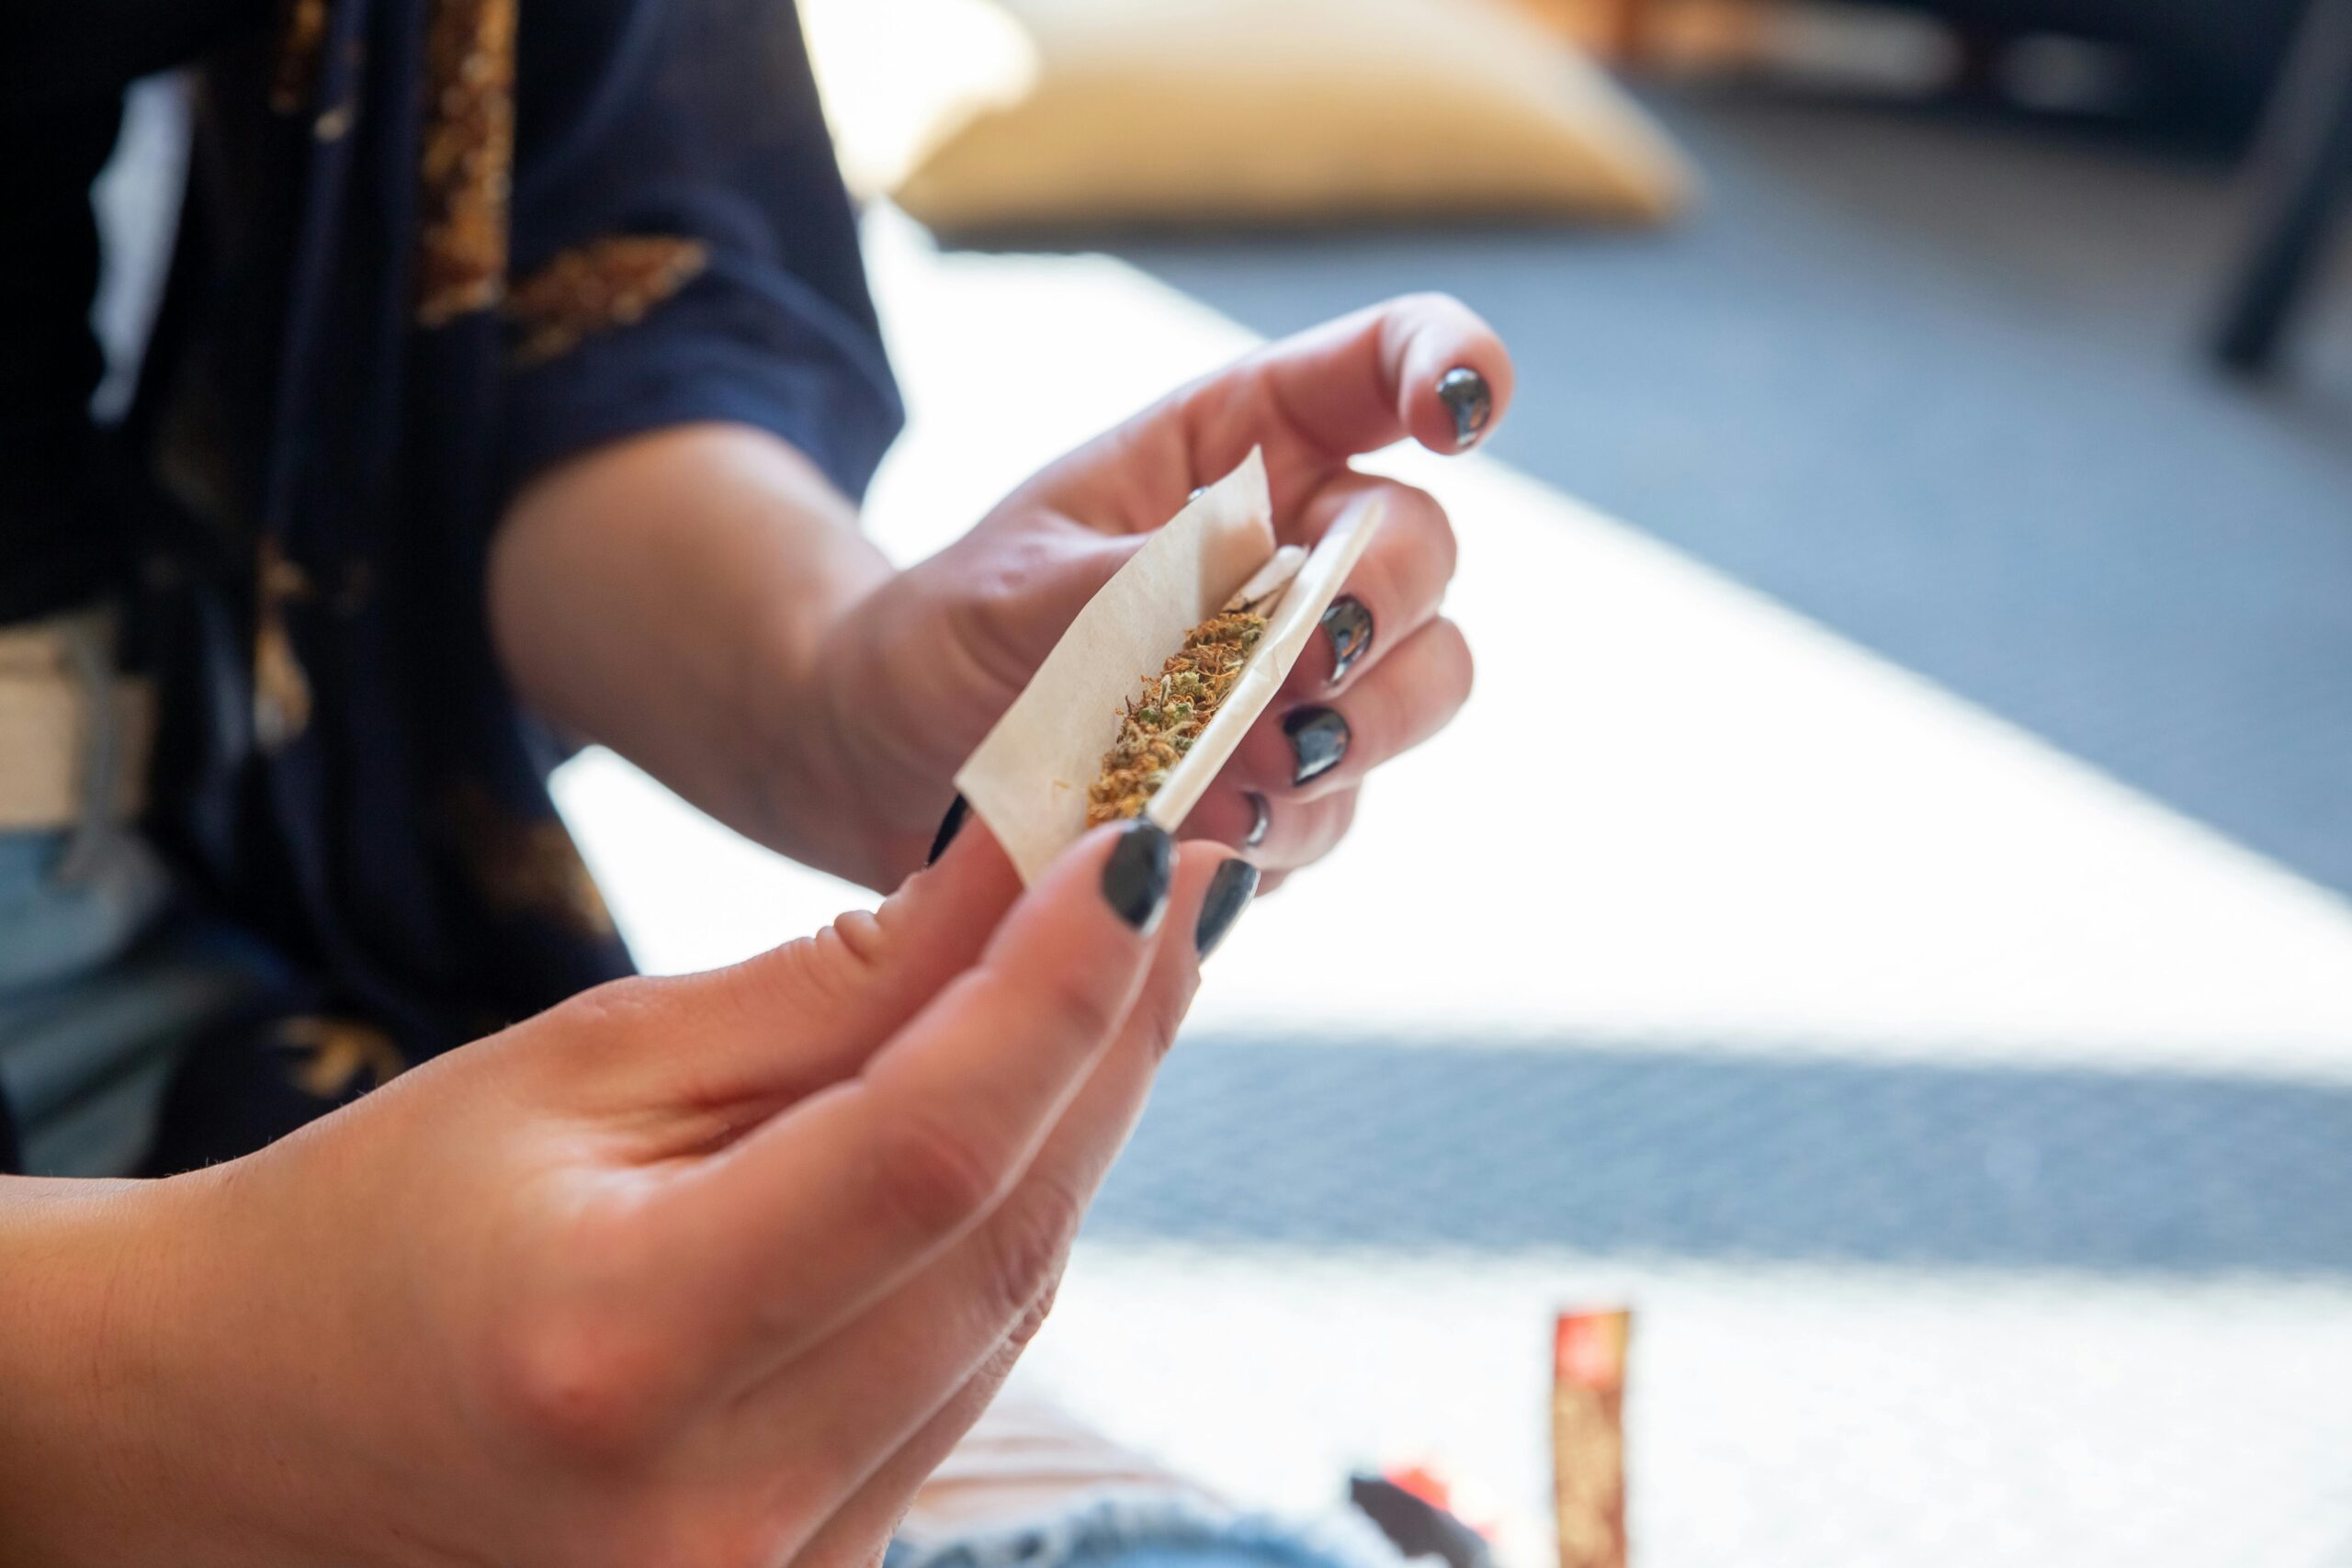
Rolling a joint might seem straightforward, but there’s actually an art and science behind it. First, you need to gather the essentials: quality rolling papers, a grinder, and your favorite cannabis strain. Grinding your herb evenly is crucial because it ensures a consistent burn—nobody wants a joint that’s too tight or too loose, right? Next comes the rolling paper, which comes in various sizes and materials like hemp or rice paper. Choosing the right paper can affect both the taste and burn time, so don’t overlook this step. Expert rollers often recommend starting with a small amount of ground cannabis, evenly distributed along the paper’s crease.
Now, the magic happens when you begin to shape your joint. Using your thumbs and index fingers, carefully tuck the paper around the herb while gently rolling it back and forth. This part requires patience—if you rush, the joint might end up uneven or loose. Once you achieve that perfect cylindrical shape, lick the adhesive strip and seal the joint with a smooth motion. For a professional touch, twist the ends or use a crutch (filter tip) to improve airflow and stability. With practice, you’ll be amazed at how quickly you can master this essential cannabis skill!
Step-by-Step Guide: How to Roll a Perfect Joint Every Time Like a Pro
Rolling a joint might seem simple at first glance, but getting it right every time like a pro requires some know-how and a bit of practice. Whether you’re new to this or just want to up your game in New York’s vibrant cannabis scene, this step-by-step guide is here to help. You’ll find tips, tricks, and even some history behind rolling joints that you probably didn’t know before. So, take a seat, grab your materials, and let’s get started.
A Little History About Rolling Joints
Before we dive into the how-to, let’s talk about where rolling joints came from. The practice of smoking cannabis dates back thousands of years, but the actual joint as we know it became popular in the 20th century, especially during the counterculture movements of the 1960s. Rolling papers evolved from simple rice or hemp papers to more refined options like flax or even gold leaf for luxury smoking. Understanding this history adds a bit of appreciation for the craft you’re about to learn.
What You’ll Need to Roll Like a Pro
First things first, gather all your materials. Having everything ready makes the process smoother and less frustrating.
- Rolling papers: Usually made of hemp, rice, or wood pulp
- Cannabis flower: Ground finely but not too powdery
- Filter or crutch: Optional but highly recommended for better airflow
- Grinder: Helps break down the cannabis evenly
- Rolling tray: Keeps everything tidy and prevents spills
Step-by-Step Guide: How to Roll a Joint
Grind your cannabis
Use a grinder to break down the flower into small, even pieces. If you don’t have one, breaking it up by hand works but it won’t be as consistent.Prepare the filter
Roll a small piece of thick paper or buy pre-made filters. This stops bits of cannabis from getting in your mouth and helps hold the joint’s shape.Place the rolling paper
Put the rolling paper on a flat surface with the glue strip facing up and away from you.Add the filter
Place the filter on one end of the paper.Fill with ground cannabis
Spread the ground cannabis evenly along the paper. Don’t overfill it, or it’ll be hard to roll.Shape the joint
Using your fingers, gently roll the paper back and forth to shape the cannabis into a cylinder.Roll it up
Tuck the non-glue side of the paper around the cannabis, then lick the glue strip and press it down to seal.Pack and finish
Use a pen or similar object to pack the open end gently, then twist the tip to close it.
Expert Tips You Need to Know
- Don’t rush the process; impatient rolling often leads to uneven or loose joints.
- Use slow, gentle pressure when shaping to keep the joint tight but not too tight.
- If your joint is too loose, it will burn unevenly and waste your cannabis.
- Try different rolling papers to find what works best for you; some burn faster or slower.
- Practice makes perfect — even pros mess up sometimes.
Comparing Rolling Methods
There are different ways to roll a joint, and everyone has their preferred style. Here’s a simple comparison of three popular methods:
| Method | Difficulty | Speed | Result Quality |
|---|---|---|---|
| Classic Roll | Medium | Medium | Good, consistent |
| Cone Roll | Easy | Fast | Burns evenly, good airflow |
| Twist Roll | Hard | Slow | Very tight, but tricky for beginners |
Common Mistakes Beginners Make
- Overfilling joints which makes them hard to roll and smoke
- Using poor quality papers that tear easily
- Forgetting the filter, leading to harsher hits
- Rolling too loosely, causing uneven burning and waste
Practical Example: Rolling a Joint in New York
Imagine you just bought some premium cannabis from a local dispensary in Manhattan. You’re excited but nervous to roll your first joint. Start by breaking down your flower with a grinder you got from a Brooklyn headshop. Use hemp rolling papers because they are easier to handle and have a cleaner taste. Don’t forget to include a filter; it will make the smoking experience way better, especially if you’re sharing with friends. Take your time spreading the cannabis evenly, and don’t rush the sealing step. Before you know it, you’ll be enjoying a smooth, evenly burning joint right in Central Park or on your rooftop.
Rolling a perfect joint is a skill that combines art and technique. While this guide gives you the basics and some expert tips, remember that everyone’s hands and preferences differ. The best joint is the one that feels right for you. So
7 Expert Tips for Rolling a Joint Smoothly and Evenly – Ultimate How-To
Rolling a joint might seem simple at first glance, but getting it smooth and evenly packed takes bit more practice and know-how than most people think. Whether you’re new to the world of rolling or been doing it for a while, knowing some expert tips can really step up your game. This article dives into 7 expert tips for rolling a joint smoothly and evenly, so you can impress your friends or just enjoy a better smoking experience yourself. We’ll cover everything from choosing the right papers to packing techniques, and even a little history behind the art of joint rolling in New York and beyond.
Why Rolling a Joint Like a Pro Matter?
Rolling a joint is not just about putting weed in paper and lighting it up. If you roll it poorly, it burns unevenly, goes out quickly, or tastes harsh. A well-rolled joint burns evenly, holds the right amount of herb, and gives you smooth hits. Plus, it just looks better and shows some respect for your craft. In places like New York where cannabis culture is growing fast, being able to roll a joint properly is almost like a rite of passage.
Historically, joints have been rolled since the early 20th century, with influences from many cultures including Mexican and Jamaican smokers. The papers used today evolved from simple rice or hemp leaves to specialized rolling papers that come in different sizes and materials. Knowing how to roll like a pro taps into this long tradition.
1. Pick the Right Rolling Papers
Not all papers are the same. Some are thin, others thick. Some burn fast, others slow. The material can be hemp, rice, or wood pulp. If you want a smooth and even roll, start with quality papers that you like to smoke.
- Thin papers burn slower and give less paper taste.
- Hemp papers are natural and sturdy but might be thicker.
- Rice papers are thin, but can be fragile for beginners.
Try out different brands and see which fits your style. In New York, many head shops offer local favorites, which could be a good place to start.
2. Grind Your Herb Properly
Grinding your cannabis is crucial. If it’s too coarse, your joint will be lumpy and uneven. Too fine, and it might burn too quickly or clog airflow.
- Use a grinder with multiple chambers for best results.
- Avoid grinding into powder; a fluffy, crumbly texture works best.
- Hand breaking is okay, but less consistent.
Grinding ensures the weed packs evenly and burns well.
3. Use a Filter or Crutch for Stability
A filter, sometimes called a crutch, is a small piece of rolled paper or cardboard you put at one end of the joint. It keeps the shape stable and stops small bits of herb from getting into your mouth.
Filters also help with airflow, making the joint easier to draw from. You can buy pre-made filters or make your own from a piece of thick paper or business card.
4. Don’t Overfill or Underfill Your Joint
Finding the right amount of herb to fill your paper is an art itself. Too much, and it becomes hard to roll and might crack. Too little, and it burns too fast or unevenly.
A good rule of thumb:
- Use about 0.3 to 0.5 grams of cannabis for a standard 1¼ size paper.
- Spread the herb evenly along the paper length before rolling.
This balance helps in getting a joint that rolls tight but not too tight.
5. Roll with Steady Hands and Patience
Rolling needs some finger dexterity and patience, no matter how many joints you’ve rolled before. Rushing can cause tears in the paper or uneven shape.
Try this step-by-step approach:
- Place the paper with the adhesive side facing you, on top.
- Evenly distribute the herb along the paper.
- Gently roll back and forth to shape the joint.
- Tuck the non-adhesive side over the herb and start rolling.
- Lick the adhesive edge and seal it.
If you mess up, don’t stress, just try again. Practice makes progress!
6. Pack and Tap to Ensure Evenness
After sealing your joint, you want to pack it a bit to make sure the herb is compact and even. Use a pen, stick, or similar object to gently pack the weed from the open end.
Then tap the filter end of your joint on a hard surface lightly to settle the herb evenly. This avoids loose spots that cause uneven burning.
7. Twist the End for a Clean Finish
Once packed and sealed, twist the open end of your joint to close it off. This keeps the herb inside and gives it a neat look. It also makes lighting easier and prevents spillage.
If you want to get fancy, some rollers fold the end in a little cone shape before twisting.
For anyone wondering how to roll a joint
What Are the Best Rolling Papers and Tools for Rolling a Joint Like a Pro?
Rolling a joint might seem like a simple task, but doing it like a pro takes more than just throwing some cannabis into a paper and lighting it up. If you’re in New York, or anywhere else really, knowing what are the best rolling papers and tools for rolling a joint like a pro can make a big difference in your smoking experience. This article will guide you through the essentials, with tips and tricks that even beginners can follow. Plus, a little history and a comparison of popular products to help you pick whats best for you.
What Are Rolling Papers and Why They Matter?
Rolling papers are thin sheets used to wrap cannabis into a joint. They comes in different sizes, materials, and thicknesses, which all affect how your joint burns and tastes. The history of rolling papers goes back centuries, with some sources saying they originated in Spain around the 16th century. Over the years, they evolved from simple wood pulp papers to hemp, rice, and even flax-based papers.
Why it really matter about the paper? Because it influences the burn rate, flavor, and overall smoothness of your smoke. Using poor quality paper can make your joint burn unevenly or produce a harsh taste.
Best Rolling Papers for Pro-Level Joints
Here’s a list of some most popular rolling papers that many New Yorkers and enthusiasts swear by:
RAW Rolling Papers
Made from unrefined hemp, RAW papers are well-known for their natural taste and slow, even burn. They come with a crisscross watermark that prevents runs and a natural gum line.Elements Rice Papers
These are ultra-thin and made from rice, which means they burn very slow and almost without any ash. Great if you want a pure cannabis flavor without paper taste.OCB Premium Rolling Papers
French-made papers, OCB is famous for their thinness and smooth burn. They offer different sizes and types, including organic hemp papers.Zig-Zag Rolling Papers
Zig-Zag has been around since the 19th century and remains a classic. Their papers are thicker than RAW or Elements but are reliable, easy to handle, and affordable.Juicy Jay’s Flavored Papers
For those who want a twist, Juicy Jay’s offers flavored rolling papers. They add a bit of sweetness or fruitiness to your smoke, but some people find flavors overpowering.
Essential Tools for Rolling Like a Pro
Rolling papers are just one part of the equation. Having the right tools can make the difference between a sloppy joint and a smooth, well-packed one.
Grinder
A good grinder is a must-have. It breaks down your cannabis evenly so it burn uniform. Using your fingers or scissors often results in uneven buds that don’t burn well.Rolling Tray
This keeps everything clean and organized. A flat, non-stick tray helps you catch any cannabis that falls and makes rolling easier.Filter Tips (Crutches)
These small pieces of cardboard or pre-made filters stop the joint from collapsing and keep weed from getting into your mouth. Plus, they provide a better grip.Rolling Machine
For beginners or those who want consistent results, a rolling machine can be handy. It’s a small device where you place the paper and cannabis, then roll it with ease.Tweezers or Joint Packing Tool
These are used to pack the cannabis more tightly inside the joint, which helps it burn longer and slower.
How To Roll A Joint Like A Pro: Step-by-Step
Here’s a practical guide for beginners and those who want to improve their rolling skills:
Grind Your Cannabis
Use a grinder for an even texture. Avoid over grinding to powder – you want fluffy but consistent bits.Prepare Your Filter Tip
Roll a small piece of thick paper or use a pre-made tip to form a little cylinder.Fill the Paper
Place your rolling paper on a flat surface or your rolling tray with the glue strip facing up and away from you. Put the filter at one end and evenly spread the ground cannabis.Shape Your Joint
Use your thumbs and index fingers to gently roll the paper back and forth, shaping the cannabis into a cylinder.Roll and Seal
Once shaped, tuck the unglued side of the paper under the cannabis and roll upwards. Lick the glue strip and finish rolling to seal the joint.Pack and Twist
Use a packing tool or your finger to pack down the open end, then twist it to close.
Comparing Popular Rolling Papers
| Brand | Material | Thickness | Burn Rate | Flavor Impact | Price Range |
|—————|————-|—————-|————-|——————|
How to Roll a Joint for Beginners: Common Mistakes and How to Avoid Them
Learning how to roll a joint is an art form that many beginners in New York and beyond wants to master. It’s not just about stuffing some weed in a paper and lighting it up. There’s a technique, some tricks, and yes, mistakes that almost everyone makes at first. If you been struggling, or just want to improve your skills, this guide on how to roll a joint for beginners will help you avoid common errors and roll like a pro in no time.
Why Rolling a Joint Matters
Rolling a joint been a tradition for decades, dating back to early cannabis users in the 20th century. Before pre-rolls and vaporizers, joints was the most common way people consumed marijuana. Rolling it yourself can be cheaper, more satisfying, and you get control over the quality and size. Also, doing it wrong can waste your good herb or make it hard to smoke.
Common Mistakes Beginners Make When Rolling a Joint
Many new rollers think it’s easy but they quickly learn it’s not. Here are typical mistakes and how you can dodge them:
- Using too much or too little weed: Overstuffing makes it hard to close, underfilling makes it loose and uneven.
- Not grinding the weed properly: Big chunks don’t burn evenly.
- Forgetting to shape the joint before sealing: This leads to a lumpy or flat joint that won’t burn right.
- Using poor quality rolling papers or wrong size: Thick papers burn slow but harsh, thin papers burn fast and sometimes tear.
- Not licking the glue edge enough or too much: Not enough means it won’t stick, too much makes it soggy.
- Rolling too tight or too loose: Tight joints restrict airflow, loose ones burn quickly and uneven.
Tools You Will Need
If you want to roll a joint like a pro, you need some basic tools. You don’t need fancy stuff, but having these helps:
- Grinder: To break down your herb evenly.
- Rolling papers: Choose the size and material you like (hemp, rice, flax).
- Filter tips (optional): These stops bits of weed from coming to your mouth and help keep the joint’s shape.
- A flat surface: Rolling on your hand is okay, but flat surface make it easier.
- Patience: This one is key!
Step-by-Step Guide How To Roll A Joint
Follow these steps and you will get better with practice, remember it’s okay if it’s not perfect first time.
- Grind your weed — Use a grinder or your fingers to break the buds into small pieces.
- Make the filter tip — Fold a small piece of cardboard accordion style and roll it into a cylinder.
- Prepare your rolling paper — Place it on a flat surface with the glue edge facing you.
- Fill the paper — Evenly spread your ground weed along the paper, leaving space on one side for the filter.
- Shape the joint — Use your fingers to tuck the paper around the weed and shape it into a cone or cylinder.
- Roll and lick — Carefully roll the paper upward, lick the glue strip, and seal it.
- Pack and twist — Use a pen or stick to pack the open end and twist the tip to close it.
Expert Tips You Need to Know to Roll Like A Pro
If you want your joints to impress friends or just want smooth smoke, these tips help you step up your game:
- Use a crutch/filter every time, it make the joint more stable and easier to hold.
- Don’t rush the grinding; evenly ground herb burns better.
- Slightly moisten the weed if it too dry; this helps prevent it from burning too fast.
- Practice different shapes: cones are more flavorful, cylinders burn more evenly.
- Try rolling with different paper materials to find your favorite.
- Use a rolling machine if you struggle but don’t rely on it forever.
- Store your papers in a dry place, humidity ruins them quickly.
Comparison: Rolling By Hand vs Using Machines
| Feature | Rolling By Hand | Rolling Machine |
|---|---|---|
| Control | More control over tightness | Consistent tightness |
| Skill Level | Requires practice and skill | Easier for beginners |
| Speed | Slower, takes time | Faster, good for multiple joints |
| Customization | More flexible with size and shape | Limited to machine size |
| Cost | No extra cost | Requires buying a machine |
| Satisfaction | More satisfying and traditional | Less satisfying for some |
Practical Examples: Rolling Joints in New York
In New York, cannabis laws changed recently and many people getting into the hobby. If you buy weed from dispensaries, they often give you advice or pre-rolls. But
Advanced Techniques: How to Roll a Flawless Cone Joint for Maximum Enjoyment
Rolling a joint, especially a flawless cone joint, is an art that many beginners and even some seasoned smokers strive to master. If you ever wondered how to roll a joint like a pro, you’re not alone. This article gonna share advanced techniques to help you roll a perfect cone joint for maximum enjoyment. Whether you’re in New York or anywhere else, these tips are gonna make your smoking sessions better, trust me.
Why a Cone Joint?
Before jump into the how-to, it’s important to understand why cone joints are so popular. Unlike regular joints, cone joints taper from a wide end to a narrow tip, which allows for better airflow and an even burn. Plus, cones are easier to pack with different quantities, so they’re flexible for solo or group sessions.
Historically, joints have been rolled since the early 20th century. The cone shape started to gain popularity around the late 90s and early 2000s, as cannabis culture evolved and smoking accessories like pre-rolled cones became widely available. But nothing beats rolling your own, right?
Tools You Will Need
To roll a joint like a pro, you don’t need fancy equipment, but a few basics definitely help:
- Rolling papers (preferably hemp or rice paper)
- Filter tips or crutches (cardboard strips)
- Grinder (to break down your herb evenly)
- Rolling tray (optional but handy)
- Herb (of course)
Using a grinder is key. It makes the herb consistent in size, which helps the joint burn evenly. Avoid breaking the herb by hand if you want a smooth roll.
Step-by-Step: How to Roll a Flawless Cone Joint
Grind Your Herb
Get your herb ground evenly but not too fine. If it’s too powdery, it’ll restrict airflow; too chunky and it won’t burn well.Make the Filter Tip
Roll a small piece of cardboard into a tight cylinder or accordion fold it into an “M” shape before rolling. This acts as a mouthpiece and prevents herb from falling out.Shape Your Paper
Hold the rolling paper with the glue side facing you and up, then place the filter tip at one end. Now pinch the paper between your fingers to start shaping a cone—wider at the tip of the filter and narrowing towards the other end.Fill the Joint
Slowly add your ground herb along the paper, starting near the filter. Don’t overfill; it should be loose enough to shape but packed enough to burn evenly.Pack and Shape
Use a pen or similar object to gently pack the herb down from the open end. This helps create the cone shape and ensures the joint burns well.Roll It Up
Carefully tuck the unglued side of the paper around the herb, then lick the glue strip and seal the joint.Twist the End
Twist the open end to close the joint and keep all the herb inside.
Tips to Roll Like a Pro
- Practice makes perfect. Don’t get discouraged if your first few cones look like a mess.
- Use slow, steady hand movements. Rushing messes up the shape.
- Don’t overpack! It chokes the joint and makes it hard to draw.
- Try rolling with hemp papers for a cleaner taste.
- If you struggle, try pre-rolled cones as a training aid, then graduate to hand-rolling.
Common Mistakes Beginners Make
Here’s a quick list of what to avoid:
- Using unevenly ground herb
- Not packing the joint properly
- Overfilling or underfilling the paper
- Forgetting to twist the end, which causes the joint to unravel
- Using thick or sticky papers that don’t seal well
Cone Joint vs. Regular Joint
| Feature | Cone Joint | Regular Joint |
|---|---|---|
| Shape | Tapered cone | Cylindrical or straight |
| Burning | Burns evenly, better airflow | May burn unevenly or canoe |
| Rolling Difficulty | Slightly harder to master | Easier for beginners |
| Herb Capacity | Can hold more or less herb | Usually holds less |
| Smoking Experience | Smoother, longer burn | Shorter, more harsh sometimes |
Enhancing Your Joint Experience in New York
New York’s cannabis scene is booming, and rolling skills can elevate your sessions. Try rolling your cone joints with locally sourced hemp papers or specialty filters available in NYC smoke shops. Also, consider watching local rolling competitions or workshops — they offer great tips and tricks from pros in your area.
You might also want to experiment with adding concentrates or kief to the tip of your joint for a boosted effect. Just remember
Conclusion
Rolling a joint is a skill that combines patience, practice, and attention to detail. By selecting quality materials, grinding your herb evenly, and using the right rolling paper, you set the foundation for a smooth and enjoyable experience. Remember to distribute the cannabis evenly and tuck the paper carefully to avoid tearing or uneven burns. Taking your time to perfect the technique will not only enhance the smoking experience but also make it more satisfying. Whether you’re a beginner or looking to refine your skills, these steps can help you roll consistently well-crafted joints. Ultimately, rolling your own joint offers a personalized touch that pre-rolled options simply can’t match. So gather your supplies, practice the steps outlined, and enjoy the process—it’s all part of the ritual. With a little effort, you’ll be able to roll joints that meet your preferences every time.


